

More Actions on Cluster Master
Push Bundles/Apps
You should not push any Apps individually onto an indexer. Instead, install and configure the Apps on the cluster master node and then push the changes to all the indexers. The following is the common configuration space on the master node-ster-![]()
How to push the configuration changes to the indexers:
-
Go to Master node UI.
-
Go to Settings > Indexer Clustering.
-
Click Edit > Configuration Bundle Actions.
-
(Optional) Click Validate and Check Restart > Validate and Check Restart.
-
It is recommended to validate the bundle before pushing it to the indexers.
-
-
Click Push.
-
Click Push Changes.
Where to find the configuration on the individual indexers?
![]()
Indexes.conf
One thing that you will end up running into is the fact that over time, you will need to remove and add many indexes in your environment and to manage and edit those within each App is daunting. Instead, I recommended having an app called master_indexes (You can have any other name) and put an indexes.conf file in the local directory of this App and place all the indexes definitions in this file. Please note, if you enabled replication (see below)

add the following line to each index “ repFactor = auto” in all the stanzas of indexes.conf to tell Splunk to replicate the index across the cluster.
License Master
-
Follow all the steps of making a Splunk Instance as Search head including forwarding data to the indexers. See the section above- Search Head
-
Install Licence
-
Go to Settings > Licensing.
-
Click Add License.
-
Click Choose File. Browse for your license file and select it.
-
Click Install.
-
Make All Other Nodes As Slave Nodes
Follow the steps below on all the other instances in the cluster including the Master Node.
-
Navigate to Settings > Licensing.
-
Click Change to Slave.
-
Switch the radio button from Designate this Splunk instance as the Master License Server to designate a different Splunk instance as the Master License Server.
-
Specify the License Master to which this License Slave should report. You must provide either an IP address or a hostname, as well as the Splunk management port, which is 8089 by default.
-
Click Save.
-
Restart Splunk Enterprise.
Search Head
-
Install Splunk.
-
Go to Splunk Web.
-
Settings > Indexer Clustering.
-
Select Enable Indexer Clustering.
-
Select the Search Head Node and click Next.
-
There are a few fields to fill out:
-
Master URI – https://:8089
-
Security key – Security Key is the key that you specified while configuring the Master Node.
-
-
Click Enable Search Head Node.
-
Restart Splunk.
DMC (Distributed Monitoring Console)
Installation
-
Follow all the steps of making a Splunk Instance as Search head. See the section above: Search Head
Add All The Instances In A Distributed Search
-
Navigate to Settings > Distributed search > Search peers.
-
Click New.
-
Fill in the requested fields (see below and click Save)
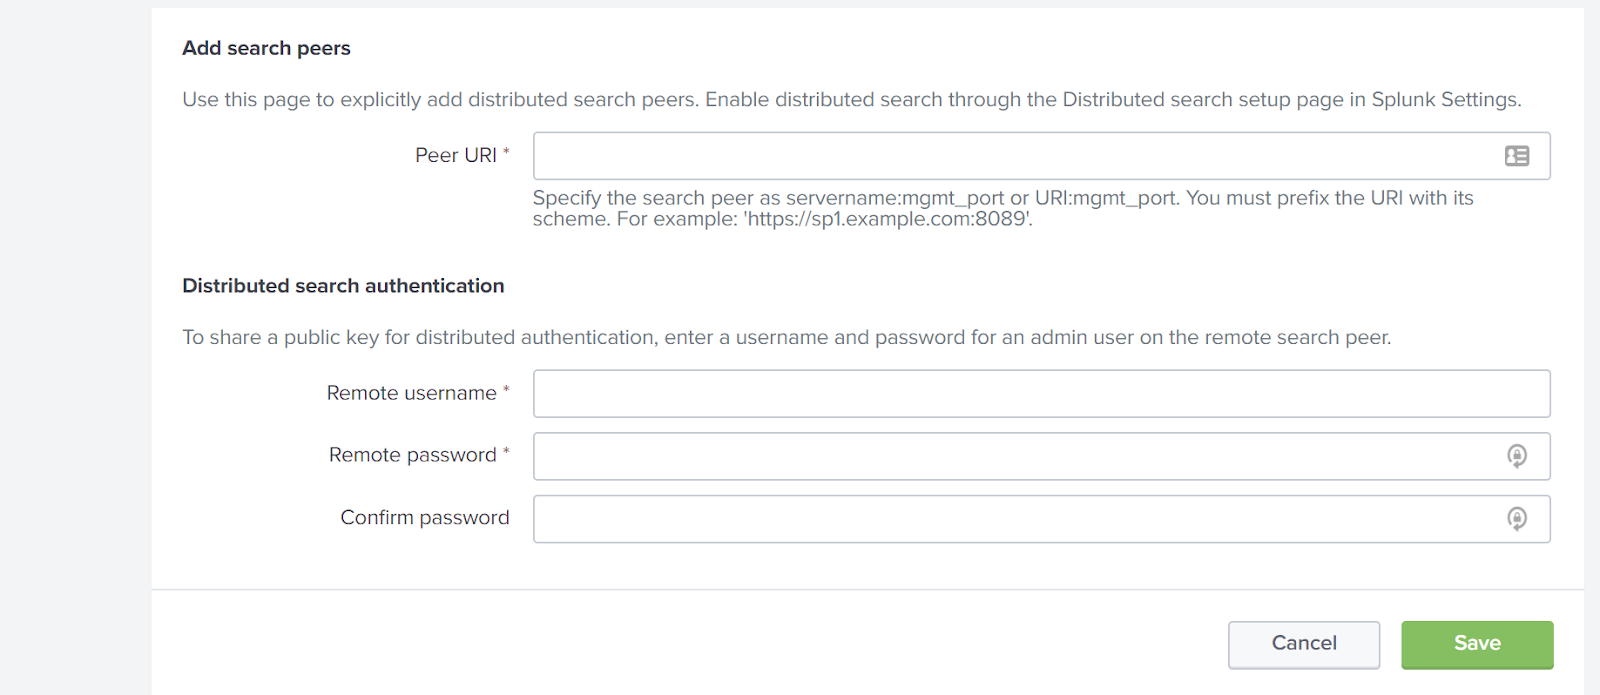
-
Repeat steps 3 and 4 for each search head, deployment server, license master, and cluster master.
Enable DMC
-
Navigate to Settings > Monitoring Console.
-
Go to Settings > General Setup.
-
Click Distributed Mode.
-
Confirm the following:
-
The columns labeled instance and machine are populated correctly and show unique values within each column.
-
The server roles are correct. For example, a Search Head that is also a Licensed Master must have both server roles listed. If not, click Edit > Edit Server Roles and select the correct server roles for the instance.
-
Make sure the cluster master instance is set to the cluster master server role. If not, click Edit > Edit Server Roles and select the correct server role.
-
Make sure anything marked as an indexer is actually an indexer.
-
-
Click Apply Changes.
Notes
-
You can add the DMC and or License Master to any machine that is not under a heavy usage load.
-
Do not enable any other management tasks on the Cluster Master Node as it has the heavy load of managing the cluster.
Final Note:
Sometimes in a clustered environment, the search head is used to collect data from a cloud tenancy (through an App or TA), however, that data will not make its way to the indexers which will make it unsearchable by other search heads. The correct way to address that is by forwarding any data the search head collects to the Indexers.
Forward Data to Indexers
-
Create an outputs.conf file in the

-
Put the below content in the file.
# Turn off indexing on the node
[indexAndForward]
index = false
[tcpout]
defaultGroup = my_peers_nodes
forwardedindex.filter.disable = true
indexAndForward = false
[tcpout:my_peers_nodes]
server=10.10.10.1:9997,10.10.10.2:9997,10.10.10.3:9997
Here, replace IP addresses with the IP addresses of Indexers.
Written by Usama Houlila.
Any questions, comments, or feedback are appreciated! Leave a comment or send me an email to uhoulila@cr.jlizardo.com for any questions you might have.